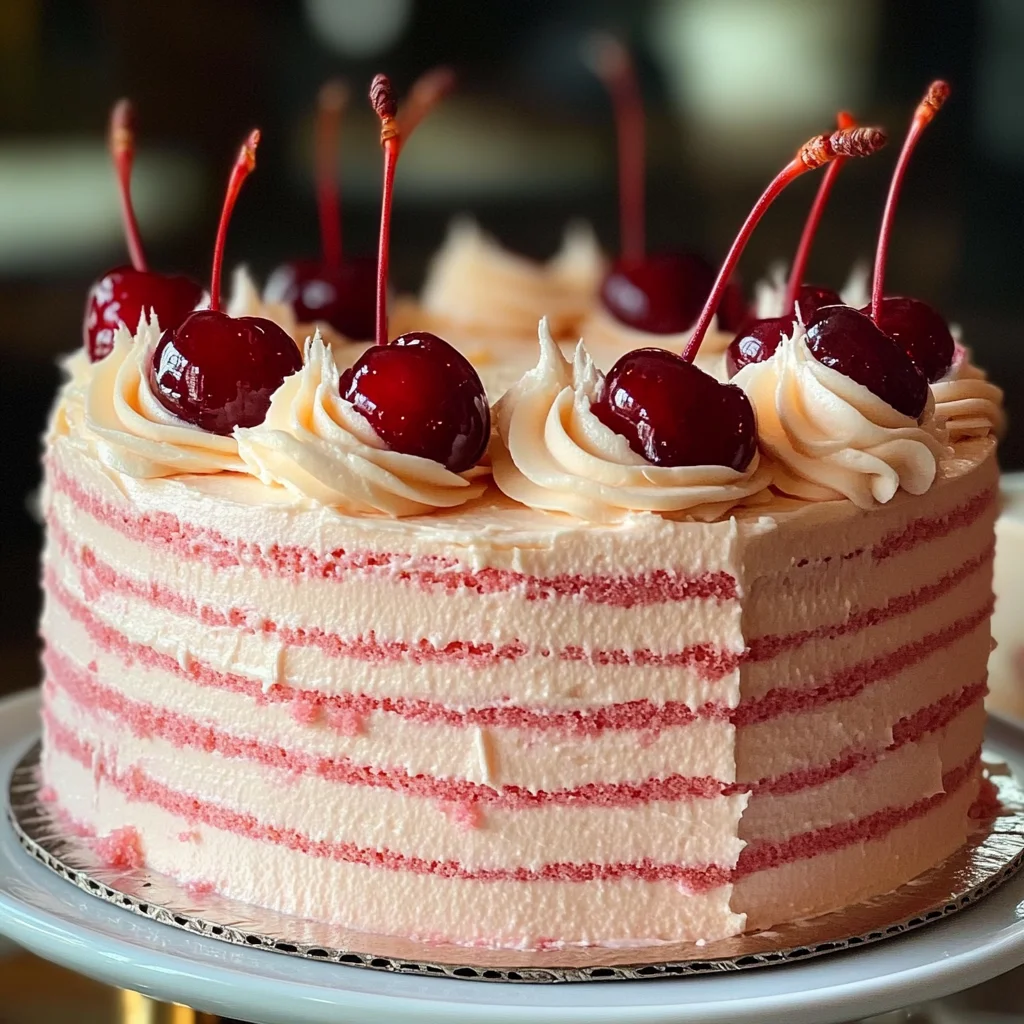
Vintage Maraschino Cherry Cake
If you’re looking for a cake that brings back sweet memories, the Vintage Maraschino Cherry Cake is just the ticket. This nostalgic treat not only has a delightful pink hue, but it is also bursting with the sweet flavor of maraschino cherries. I can’t help but smile when I think of this cake—it’s perfect for birthdays, family celebrations, or even just a cozy evening at home. Each slice is like a hug from the past, reminding us of simpler times spent with loved ones.
What I love most about this cake is its moist texture and lovely frosting. It’s an easy recipe that anyone can make, and it never fails to impress. Grab your mixing bowl and let’s dive into this delightful dessert!
Why You’ll Love This Recipe
- Easy to Make: Even if you’re new to baking, this cake comes together quickly and easily.
- Family-Friendly: Kids and adults alike will adore the sweet cherry flavor and charming look of this cake.
- Perfect for Any Occasion: Whether it’s a holiday gathering or a casual weeknight dessert, this cake fits right in.
- Make Ahead: You can bake the layers in advance and frost them just before serving!
- Visually Stunning: The pink color and lovely garnishes create an eye-catching centerpiece for any table.

Ingredients You’ll Need
To create this Vintage Maraschino Cherry Cake, you’ll need some simple, wholesome ingredients that you probably already have in your pantry. Let’s gather everything you need:
For the Cake
- 2 ½ cups all-purpose flour
- 2 ½ teaspoons baking powder
- ½ teaspoon salt
- ¾ cup unsalted butter, softened
- 1 ¾ cups granulated sugar
- 4 large eggs
- ½ cup maraschino cherry juice
- ½ cup milk
- 2 teaspoons vanilla extract
- ¾ cup maraschino cherries, chopped
For the Frosting
- 1 cup unsalted butter, softened
- 4 cups powdered sugar
- 2 tablespoons maraschino cherry juice
- 1 teaspoon vanilla extract
- 2 tablespoons milk (if needed for consistency)
- Whole maraschino cherries for garnish
Variations
One of the great things about the Vintage Maraschino Cherry Cake is its flexibility! Here are a few fun variations to try:
- Add Nuts: Toss in some chopped walnuts or pecans for added crunch and flavor.
- Use Different Fruit: Swap maraschino cherries for fresh strawberries or raspberries to change things up.
- Flavor Twist: Add almond extract instead of vanilla for a nutty aroma that pairs wonderfully with cherries.
- Chocolate Drizzle: Drizzle melted chocolate over the frosted cake for an indulgent touch!
How to Make Vintage Maraschino Cherry Cake
Step 1: Preheat & Prepare Pans
First things first—preheat your oven to 350°F (175°C). This ensures your cakes bake evenly. While your oven heats up, grease and flour two 9-inch round cake pans or line them with parchment paper. This step helps prevent sticking and makes it easier to remove your cakes later.
Step 2: Mix Dry Ingredients
In a medium bowl, whisk together the flour, baking powder, and salt. This mix is essential as it gives structure to your cake while allowing it to rise beautifully.
Step 3: Cream Butter & Sugar
In a large mixing bowl, beat the softened butter and granulated sugar together until light and fluffy. This process incorporates air into your batter, resulting in a lighter texture.
Step 4: Add Eggs & Flavorings
Next, beat in the eggs one at a time. Mixing well after each addition ensures they’re fully incorporated. Then mix in the vanilla extract and maraschino cherry juice; these will infuse your batter with delicious flavor!
Step 5: Incorporate Dry Ingredients & Milk
Gradually add in the dry ingredients in three parts while alternating with milk. This method keeps your batter smooth without overmixing—overmixing can lead to a dense texture.
Step 6: Fold in Cherries
Now it’s time to gently fold in those beautiful chopped maraschino cherries! They’ll add pops of sweetness throughout each slice.
Step 7: Bake the Cakes
Divide the batter evenly between your prepared cake pans. Bake them for about 25-30 minutes or until a toothpick inserted into the center comes out clean. The smell wafting through your kitchen will be heavenly!
Step 8: Cool Completely
Let the cakes cool in their pans for about 10 minutes before transferring them to a wire rack to cool completely. Cooling prevents sogginess when you frost!
Step 9: Prepare the Frosting
While your cakes are cooling down, beat together one cup of softened butter until creamy. Gradually add powdered sugar while mixing until smooth—this will create a luscious frosting.
Step 10: Assemble & Decorate
Spread frosting over the first layer of cooled cake, then place the second layer on top and frost the entire cake generously. Finish off by garnishing with whole maraschino cherries for that classic vintage look!
And there you have it—a beautiful Vintage Maraschino Cherry Cake that’s sure to become a favorite! Enjoy every slice filled with nostalgia and sweetness!
Pro Tips for Making Vintage Maraschino Cherry Cake
Baking can be a delightful experience, and with these tips, you’ll ensure your Vintage Maraschino Cherry Cake turns out perfectly every time!
-
Use room temperature ingredients: Allowing your butter, eggs, and milk to reach room temperature helps them blend more easily, resulting in a smoother batter and an even texture in your cake.
-
Avoid over-mixing: When incorporating the dry ingredients and milk into the batter, mix just until combined. Over-mixing can lead to a dense cake instead of the light and fluffy texture we desire.
-
Check for doneness: Ovens can vary in temperature, so it’s always best to start checking your cake a few minutes before the suggested baking time. A toothpick should come out clean when inserted into the center of the cake.
-
Cool completely before frosting: Giving your cakes time to cool completely prevents the frosting from melting off. This also allows flavors to settle and enhances the overall taste of your cake.
-
Experiment with different extracts: While vanilla extract is traditional, feel free to add a hint of almond extract for an extra layer of flavor that complements the cherries beautifully.
How to Serve Vintage Maraschino Cherry Cake
Presenting your Vintage Maraschino Cherry Cake can enhance its appeal at any gathering! Here are some ideas for serving this delightful dessert.
Garnishes
- Fresh mint leaves: A few sprigs of mint add a pop of color and a refreshing contrast to the sweetness of the cake.
- Whipped coconut cream: For a dairy-free twist, top each slice with whipped coconut cream; it adds a lightness that pairs well with the cherry flavor.
- Chocolate shavings: Sprinkle some dark or dairy-free chocolate shavings on top for an elegant touch that balances sweetness with richness.
Side Dishes
- Vanilla ice cream: A scoop of creamy vanilla ice cream goes perfectly alongside each slice, offering a lovely contrast in temperature and texture.
- Fruit salad: A fresh fruit salad made with seasonal fruits adds brightness and complements the sweet cherry flavors without overwhelming them.
- Coffee or tea: Serve slices of cake with freshly brewed coffee or aromatic tea; their subtle bitterness will balance the sweetness beautifully.
- Lemon sorbet: For a refreshing palate cleanser, lemon sorbet is an excellent choice; it’s light and zesty, making it an ideal companion to this rich dessert.
Now you’re ready to bake and serve this charming Vintage Maraschino Cherry Cake! Whether it’s a special occasion or just because, this delightful treat is sure to bring smiles all around. Enjoy!
Make Ahead and Storage
This Vintage Maraschino Cherry Cake is perfect for meal prep and can be made ahead of time to enjoy later. It stores well, allowing you to savor its delightful flavors at your convenience.
Storing Leftovers
- Store the leftover cake in an airtight container at room temperature for up to 3 days.
- If your kitchen is warm, consider refrigerating it to keep it fresh longer.
- For best results, place a piece of wax paper between the cake and the lid to prevent sticking.
Freezing
- Wrap individual slices or the whole cake tightly in plastic wrap.
- Place the wrapped cake in a freezer-safe bag or container.
- Freeze for up to 3 months; allow it to thaw overnight in the refrigerator before serving.
Reheating
- If you prefer your cake warm, place a slice in the microwave for about 10-15 seconds.
- Alternatively, you can reheat slices in a preheated oven at 350°F (175°C) for about 5-7 minutes.
FAQs
Here are some common questions about the Vintage Maraschino Cherry Cake that might help you out!
Can I use fresh cherries instead of maraschino cherries?
While maraschino cherries give this cake its signature flavor and color, you can substitute with fresh cherries. Just chop them finely and adjust the sweetness if necessary.
How do I make my Vintage Maraschino Cherry Cake more flavorful?
To enhance the flavors of your Vintage Maraschino Cherry Cake, consider adding a teaspoon of almond extract along with vanilla extract. This will complement the cherry flavor beautifully!
Can I decorate my Vintage Maraschino Cherry Cake differently?
Absolutely! You can add sprinkles, chocolate shavings, or even edible flowers for a unique twist. Get creative with your decorations!
What should I serve with my Vintage Maraschino Cherry Cake?
This delightful cake pairs wonderfully with a scoop of vanilla ice cream or a dollop of whipped cream. Fresh fruit on the side makes for a lovely presentation too!
Final Thoughts
I hope you find joy in baking this Vintage Maraschino Cherry Cake as much as I do! It’s not just a treat; it’s a slice of nostalgia that brings back sweet memories. Whether it’s for a special occasion or just because, this cake is sure to bring smiles all around. Happy baking, and savor every delicious bite!
Vintage Maraschino Cherry Cake
Indulge in the nostalgic sweetness of Vintage Maraschino Cherry Cake, a delightful dessert perfect for any celebration or cozy evening at home. This soft and moist cake, infused with the vibrant flavors of maraschino cherries, is layered with a creamy frosting that will take you back to simpler times spent with loved ones. With its charming pink hue and stunning garnishes, this cake not only tastes amazing but also creates an eye-catching centerpiece for your table. It’s an easy recipe that even novice bakers can master, ensuring your gatherings are filled with smiles and sweet memories.
- Prep Time: 20 minutes
- Cook Time: 30 minutes
- Total Time: 50 minutes
- Yield: Serves approximately 12 people 1x
- Category: Dessert
- Method: Baking
- Cuisine: American
Ingredients
- 2 ½ cups all-purpose flour
- 2 ½ teaspoons baking powder
- ½ teaspoon salt
- ¾ cup unsalted butter, softened
- 1 ¾ cups granulated sugar
- 4 large eggs
- ½ cup maraschino cherry juice
- ½ cup milk
- 2 teaspoons vanilla extract
- ¾ cup maraschino cherries, chopped
- 1 cup unsalted butter, softened (for frosting)
- 4 cups powdered sugar
- 2 tablespoons maraschino cherry juice (for frosting)
- 1 teaspoon vanilla extract (for frosting)
- 2 tablespoons milk (if needed for consistency)
- Whole maraschino cherries for garnish
Instructions
- Preheat your oven to 350°F (175°C) and grease two 9-inch round cake pans.
- In a medium bowl, whisk together flour, baking powder, and salt.
- In a large mixing bowl, cream together softened butter and sugar until light and fluffy.
- Beat in eggs one at a time followed by vanilla extract and maraschino cherry juice.
- Gradually mix in dry ingredients alternately with milk until combined. Fold in chopped cherries.
- Divide batter between prepared pans and bake for 25-30 minutes or until a toothpick comes out clean.
- Let cakes cool before frosting with a mixture of butter, powdered sugar, cherry juice, and vanilla extract. Garnish with whole cherries.
Nutrition
- Serving Size: 1 slice (89g)
- Calories: 350
- Sugar: 32g
- Sodium: 190mg
- Fat: 17g
- Saturated Fat: 10g
- Unsaturated Fat: 6g
- Trans Fat: 0g
- Carbohydrates: 47g
- Fiber: 0g
- Protein: 3g
- Cholesterol: 56mg