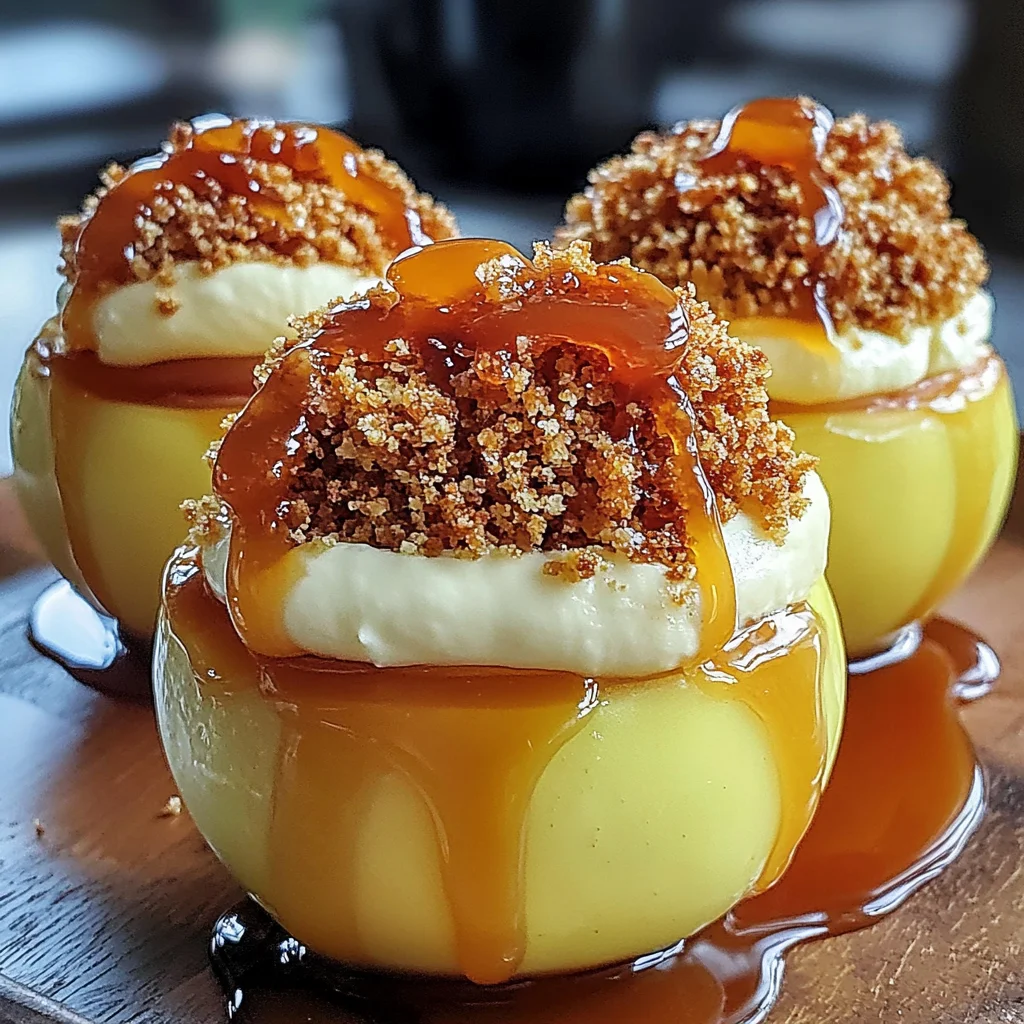
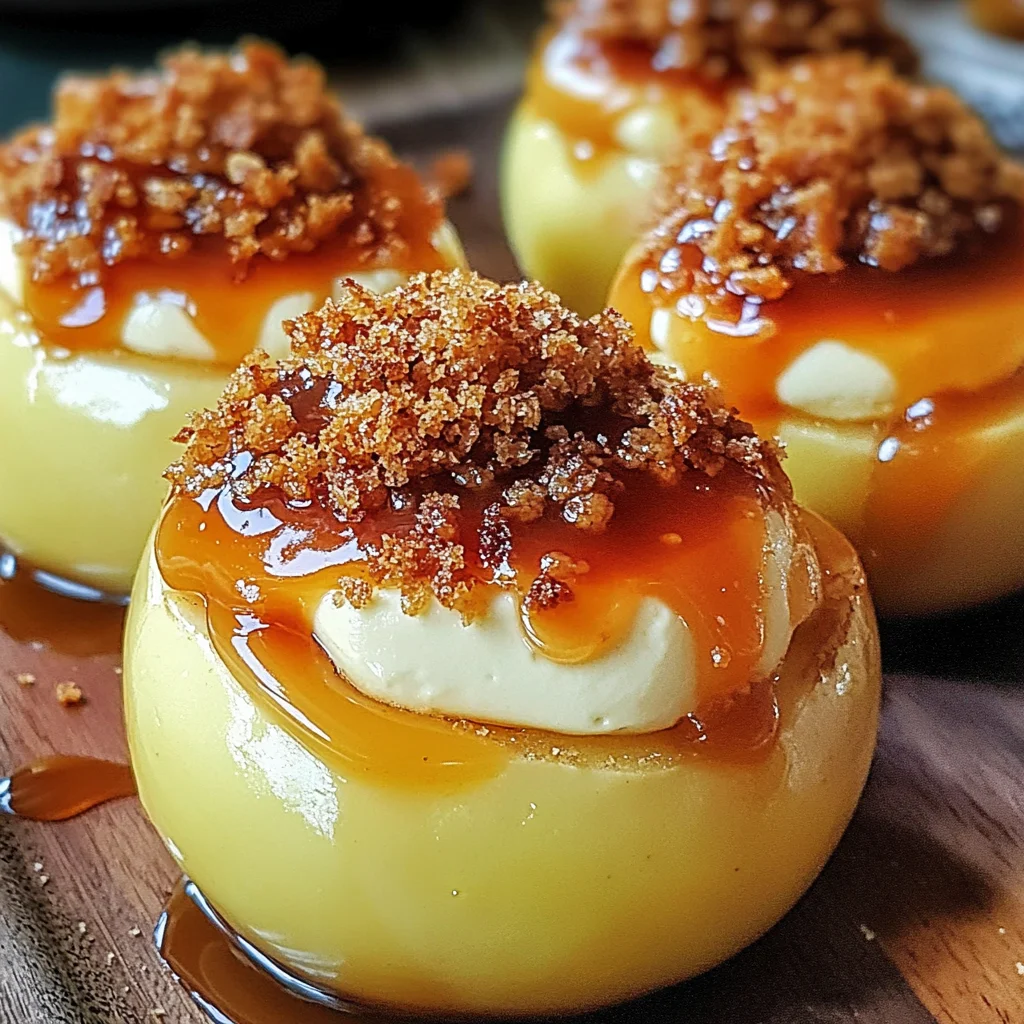
Cheesecake Stuffed Apples: A Delicious Twist on a Classic Dessert
If you’re looking for a delightful dessert that feels like a warm hug, you’ve come to the right place! These Cheesecake Stuffed Apples: A Delicious Twist on a Classic Dessert will surely become a favorite in your home. Imagine the sweet aroma of cinnamon and baked apples wafting through your kitchen as you prepare this treat. It’s perfect for busy weeknights when you want something special without too much fuss, or for family gatherings where everyone can enjoy a slice of comfort.
What makes this recipe so special is not just how easy it is to whip up but also how beautifully it combines the classic flavors of cheesecake with the wholesome goodness of apples. Trust me, once you taste these, you’ll want to share them with everyone you know!
Why You’ll Love This Recipe
- Easy to Prepare: With just a few simple steps, these stuffed apples come together quickly. Perfect for those busy days!
- Family-Friendly: Kids and adults alike will love this fun twist on dessert. Who can resist creamy cheesecake in an apple?
- Make-Ahead Convenience: You can bake these ahead of time and simply reheat them before serving. Great for meal prep!
- Delicious Flavor: The combination of sweet apples, creamy filling, and caramel drizzle creates a mouthwatering experience.
- Customizable: You can easily modify the ingredients to suit your taste or dietary needs.
Ingredients You’ll Need
Let’s gather our simple and wholesome ingredients! You’ll find that each item adds to the delightful flavors that make these Cheesecake Stuffed Apples truly irresistible.
For the Filling
- 4 medium-sized apples (Granny Smith or Honeycrisp)
- 8 oz cream cheese, softened
- 1/2 cup granulated sugar
- 1/4 cup brown sugar
- 1 tsp vanilla extract
- 1/2 tsp ground cinnamon
- 1/4 tsp salt
- 1/2 cup sour cream
- 1/2 cup crushed graham crackers
- 1/4 cup chopped nuts (optional, walnuts or pecans)
For Drizzling
- 1/4 cup caramel sauce (for drizzling)
- 1 tbsp lemon juice (to prevent browning of apples)
Variations
This recipe is wonderfully flexible! Here are a few ideas to put your unique spin on these Cheesecake Stuffed Apples:
- Add some fruit: Mix in some fresh berries or sliced strawberries into the cheesecake filling for an extra fruity twist.
- Change up the nuts: Try using almonds or pecans instead of walnuts for different flavors and textures.
- Spice it up: Add a pinch of nutmeg or allspice along with the cinnamon for an extra layer of flavor.
- Go chocolatey: Fold in some mini chocolate chips into the filling for a delightful chocolate surprise!
How to Make Cheesecake Stuffed Apples: A Delicious Twist on a Classic Dessert
Step 1: Preheat Your Oven
Preheat your oven to 350°F (175°C). This is crucial as it ensures that your apples bake evenly and soften perfectly while they fill with deliciousness.
Step 2: Prepare Your Apples
Wash the apples thoroughly under cold water and pat them dry. Carefully remove the core from each apple, leaving the bottom intact. This step creates a cozy little cavity ready to be filled with that luscious cheesecake mixture!
Step 3: Prevent Browning
Drizzle a little lemon juice inside each apple to prevent browning. This not only keeps your apples looking fresh but also adds a subtle zing to their flavor.
Step 4: Make the Cheesecake Filling
In a large mixing bowl, combine the softened cream cheese and granulated sugar. Beat on medium speed until smooth and creamy (about 2-3 minutes). This step is important because it creates a light texture in your filling.
Step 5: Flavor It Up!
Add in brown sugar, vanilla extract, ground cinnamon, and salt. Mix until well incorporated. Each ingredient plays its part in creating that classic cheesecake flavor we all love!
Step 6: Incorporate Sour Cream
Next, add the sour cream and mix until fully combined. This gives our filling its rich creaminess—it’s what dreams are made of!
Step 7: Add Crunch
Fold in crushed graham crackers and chopped nuts (if using) with a spatula. This adds texture and an extra layer of flavor that pairs beautifully with soft baked apples.
Step 8: Fill Those Apples!
Using a spoon or piping bag, fill each apple with the cheesecake mixture. Pack it gently but firmly—this helps ensure every bite is filled with goodness.
Step 9: Arrange in Baking Dish
Place the filled apples upright in a baking dish. Spoon any leftover filling around them for an extra treat later on.
Step 10: Cover and Bake
Cover the baking dish with aluminum foil and bake in your preheated oven for 25-30 minutes until the apples are tender but not mushy.
Step 11: Brown Those Tops!
Remove the foil and bake for an additional 10-15 minutes to brown the tops slightly. This step gives them that beautiful golden finish we all adore!
Step 12: Cool Before Serving
Let the apples cool for about 10 minutes before serving. This waiting period helps them set up just right!
Step 13: Drizzle & Enjoy!
Drizzle with caramel sauce and sprinkle with extra cinnamon if desired. Serve warm with vanilla ice cream or whipped cream as an indulgent treat!
And there you have it! A comforting dessert that’s sure to impress anyone who tries it! Enjoy sharing these Cheesecake Stuffed Apples at your next gathering or cozy night in!
Pro Tips for Making Cheesecake Stuffed Apples: A Delicious Twist on a Classic Dessert
Making Cheesecake Stuffed Apples can be a delightful experience, and these tips will help you achieve the best results!
-
Choose the Right Apples: Opt for firm varieties like Granny Smith or Honeycrisp, as their tartness complements the sweetness of the cheesecake filling beautifully.
-
Soften Cream Cheese Properly: Ensure your cream cheese is at room temperature before mixing. This makes it easier to achieve a smooth and creamy texture without lumps.
-
Don’t Overfill the Apples: While it’s tempting to pack in as much filling as possible, leave a little space at the top to prevent overflow during baking.
-
Experiment with Flavors: Feel free to add your favorite spices or extracts, like nutmeg or almond extract, to customize the cheesecake filling to your taste.
-
Serve Warm: For the best experience, enjoy these apples warm right out of the oven. The combination of warm fruit and cool toppings creates an irresistible contrast.
How to Serve Cheesecake Stuffed Apples: A Delicious Twist on a Classic Dessert
Presenting your Cheesecake Stuffed Apples can elevate your dessert game! Here are some creative ideas:
Garnishes
- Chopped Nuts: Sprinkle some extra chopped walnuts or pecans on top for added crunch.
- Cinnamon Sugar: A light dusting of cinnamon sugar enhances flavor and adds a delightful sweetness.
- Fresh Mint Leaves: A sprig of mint not only looks appealing but also adds a fresh aroma that complements the dessert beautifully.
Side Dishes
- Vanilla Ice Cream: A scoop of creamy vanilla ice cream pairs perfectly with warm apples, creating a classic dessert duo.
- Whipped Coconut Cream: For a dairy-free option, serve with whipped coconut cream. It adds a light and fluffy texture that contrasts nicely with the apples.
- Caramel Drizzle Cake: A slice of caramel drizzle cake can enhance your dessert table and provide guests with another sweet option.
- Fruit Salad: A refreshing fruit salad made with seasonal fruits can balance out the richness of the stuffed apples while adding color to your plate.
Enjoy these Cheesecake Stuffed Apples at your next gathering or cozy night in—they’re sure to impress!
Make Ahead and Storage
These Cheesecake Stuffed Apples are perfect for meal prep, allowing you to enjoy a delightful dessert anytime! You can prepare them in advance and store them for later enjoyment.
Storing Leftovers
- Allow the stuffed apples to cool completely before storing.
- Place them in an airtight container in the refrigerator.
- They can be stored for up to 3 days.
Freezing
- If you want to freeze the cheesecake stuffed apples, ensure they are completely cooled first.
- Wrap each apple tightly in plastic wrap or aluminum foil.
- Place them in a freezer-safe container or bag, and label with the date.
- They will keep well in the freezer for up to 2 months.
Reheating
- To reheat frozen apples, remove them from the freezer and let them thaw in the refrigerator overnight.
- Preheat your oven to 350°F (175°C).
- Place the apples in a baking dish and cover with foil.
- Bake for about 15-20 minutes until heated through. You can remove the foil during the last few minutes if you’d like to brown the tops slightly.
FAQs
Here are some common questions about making Cheesecake Stuffed Apples:
Can I make Cheesecake Stuffed Apples ahead of time?
Absolutely! You can prepare these delicious Cheesecake Stuffed Apples a day in advance and store them in the refrigerator until you’re ready to bake. Just remember to cover them well!
What types of apples work best for Cheesecake Stuffed Apples?
For Cheesecake Stuffed Apples, varieties like Granny Smith or Honeycrisp are excellent choices due to their firmness and tart flavor, which balance well with the sweet cheesecake filling.
How long do Cheesecake Stuffed Apples last?
When stored properly in an airtight container, Cheesecake Stuffed Apples can last up to 3 days in the refrigerator. If you freeze them, they will be good for about 2 months.
Can I use a different type of cheese instead of cream cheese?
While cream cheese provides that classic cheesecake flavor, you could experiment with mascarpone or a dairy-free cream cheese alternative if you’re looking for a different taste or dietary option!
Final Thoughts
I hope this recipe brings warmth and joy into your kitchen! These Cheesecake Stuffed Apples are such a delightful way to enjoy a twist on a classic dessert. They’re perfect for gatherings, cozy nights at home, or even just as a treat for yourself. Enjoy making them, and don’t hesitate to play around with flavors or toppings—your creativity is what makes cooking so special. Happy baking!
Cheesecake Stuffed Apples: A Delicious Twist on a Classic Dessert

If you’re in search of a dessert that combines simplicity and comfort, look no further than Cheesecake Stuffed Apples. These delightful treats merge the rich, creamy goodness of cheesecake with the wholesome sweetness of baked apples, creating a cozy experience that’s hard to resist. Perfect for busy weeknights or family gatherings, the enticing aroma of cinnamon and caramel wafting through your kitchen will have everyone eager to dig in. Easy to prepare and customizable to suit your preferences, these stuffed apples are sure to become a cherished favorite.
- Prep Time: 20 minutes
- Cook Time: 45 minutes
- Total Time: 1 hour 5 minutes
- Yield: Serves 4
- Category: Dessert
- Method: Baking
- Cuisine: American
Ingredients
- 4 medium-sized apples (Granny Smith or Honeycrisp)
- 8 oz cream cheese, softened
- 1/2 cup granulated sugar
- 1/4 cup brown sugar
- 1 tsp vanilla extract
- 1/2 tsp ground cinnamon
- 1/4 tsp salt
- 1/2 cup sour cream
- 1/2 cup crushed graham crackers
- 1/4 cup chopped nuts (optional)
- 1/4 cup caramel sauce (for drizzling)
- 1 tbsp lemon juice
Instructions
- Preheat oven to 350°F (175°C).
- Wash and core the apples, leaving the bottom intact.
- Drizzle lemon juice inside each apple to prevent browning.
- In a mixing bowl, beat cream cheese and granulated sugar until smooth.
- Add brown sugar, vanilla extract, cinnamon, and salt; mix well.
- Incorporate sour cream until fully combined.
- Fold in crushed graham crackers and chopped nuts if using.
- Fill each apple with cheesecake mixture.
- Place filled apples upright in a baking dish; spoon any leftover filling around them.
- Cover with foil and bake for 25-30 minutes until tender but not mushy.
- Remove foil and bake for an additional 10-15 minutes to brown tops slightly.
- Let cool for about 10 minutes before serving; drizzle with caramel sauce.
Nutrition
- Serving Size: 1 stuffed apple (180g)
- Calories: 295
- Sugar: 28g
- Sodium: 160mg
- Fat: 12g
- Saturated Fat: 7g
- Unsaturated Fat: 3g
- Trans Fat: 0g
- Carbohydrates: 43g
- Fiber: 3g
- Protein: 4g
- Cholesterol: 40mg